Navigating the Admin Console
Overview
The Admin Console is the control plane for your Claude Enterprise organisation. It is accessible only to accounts with the Admin role. Standard members see none of these screens — they interact only with the standard claude.ai interface.
Access it by signing in to claude.ai, clicking your organisation name in the left sidebar, and selecting Admin Console. The URL pattern is claude.ai/settings/org/[your-org-id]/.
This lesson walks through every major section of the console so you can find any setting without hunting.
Top-level navigation
The Admin Console is divided into six main sections:
- Overview — usage summary and org health at a glance
- Members — user management: invite, assign roles, deactivate
- Projects — visibility into all Projects in the organisation
- Security — SSO, 2FA enforcement, session settings, API key controls
- Privacy & Data — retention settings, training opt-out, data deletion requests
- Billing — seat management, invoices, payment method, plan details
The left sidebar shows these sections permanently. In the top-right corner you will find your organisation name, an account switcher (if you are an admin of multiple organisations), and your personal account settings.
Section by section
Overview
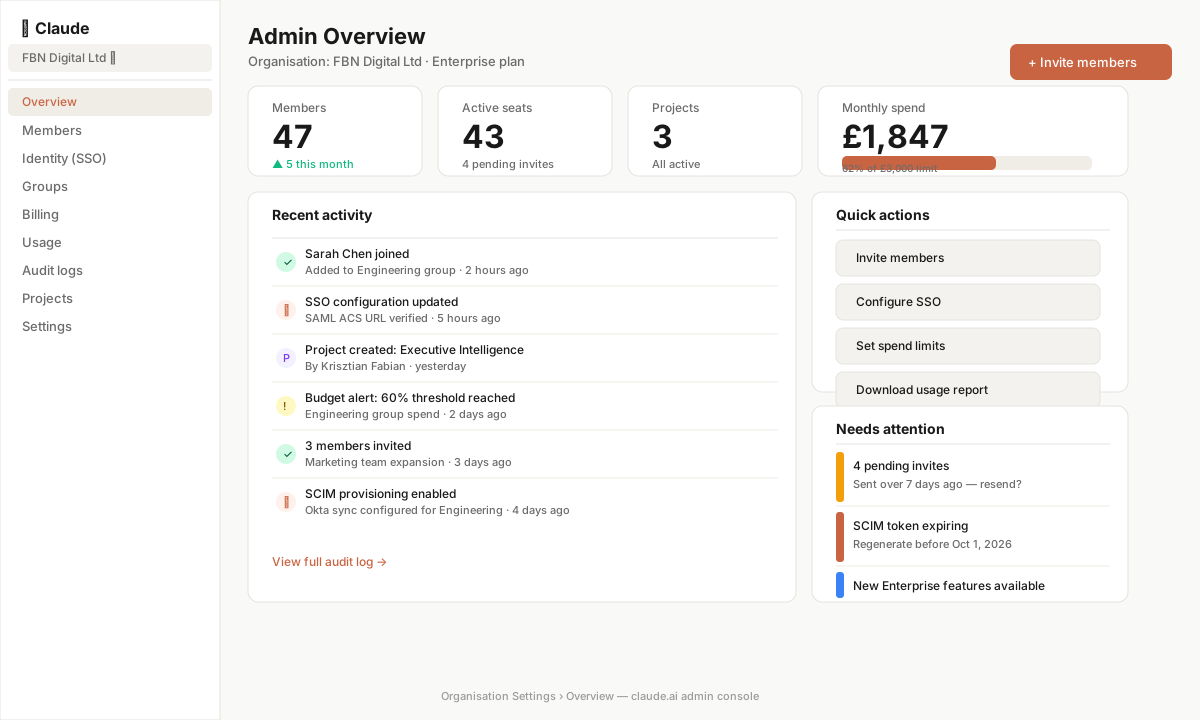
The Overview dashboard shows:
- Active users (30 days) — the number of unique users who have sent at least one message in the last 30 days. This is your adoption rate numerator.
- Total seats — the number of provisioned seats in your contract.
- Messages sent — aggregate volume for the current billing period.
- Pending invitations — invitations that have been sent but not yet accepted. High numbers here indicate an onboarding problem.
- Recent activity — a summarised audit log of admin actions (settings changes, user additions).
Use the Overview as a daily health check. If active users is significantly below total seats, investigate adoption. If messages sent is tracking toward your contract limit, address it before you hit a ceiling.
Members
The Members section is where you manage every person in the organisation. Key functions:
Invite users — click Invite members, enter email addresses (comma-separated for bulk entry) and assign a role. Select Member for standard users and Admin for other administrators. The invitation email comes from Anthropic; advise your users to expect it and check their spam folder.
Member list — shows all current members with their role, join date, last active date and status (Active/Invited/Suspended). Sorting by Last Active quickly identifies users who accepted an invitation but have never used Claude.
Manage a user — click the three-dot menu next to any user to: change their role, resend their invitation, or deactivate their account. Deactivated users immediately lose access; their conversation history is retained in the system per your retention settings.
Bulk actions — for removing multiple users at once, select checkboxes and use the bulk action menu. This is useful during offboarding cycles.
Domain verification — if you have verified ownership of your email domain, you can enable automatic joining so that any new employee who signs up with a company email address is automatically added to your organisation rather than creating a standalone personal account.
Projects
The Projects view lists all Projects created within your organisation. As an admin you can:
- See all Projects (including those created by any member)
- View Project settings, system prompts and member lists
- Archive or delete Projects
- Create new organisation-wide Projects
This view is important for governance: it is how you audit what custom configurations exist in your organisation. A Project with a poorly-written system prompt or inappropriate tool access is a governance risk; regular review of this list is good practice.
Security
The Security section contains the settings most likely to be dictated by your IT or InfoSec team:
SSO / SAML — configure your identity provider integration here. This is covered in depth in M62-L2.
Two-factor authentication — set 2FA to Required to enforce it for all members who are not using SSO (SSO users authenticate through their IdP, which typically has its own 2FA requirement).
Session duration — set the maximum time a session token remains valid. Common enterprise settings are 8 hours (workday) or 24 hours. Shorter sessions improve security but increase login friction.
API key management — control whether members can create personal API keys (for use with the Anthropic API, not with claude.ai). Enterprise plans typically restrict this to admins only unless API access is intentional.
Privacy & Data
This section is where you configure how Claude handles conversation data:
Conversation retention — set how long conversation history is retained. Options typically range from 30 days to indefinite, depending on your contract. This setting affects what users can see in their history and what data is available for deletion requests.
Model training — verify that your organisation's conversations are excluded from Anthropic's model training. Enterprise contracts include this opt-out by default; this screen confirms it is active and allows you to review the policy.
Data deletion — submit requests to delete specific user data or all data associated with a deactivated user. Use this as part of your off-boarding process for staff under GDPR or similar right-to-erasure obligations.
Billing
The Billing section is used less frequently but is important for Finance:
Plan overview — shows your current plan, contract start and end dates, and seat count.
Seat management — add or remove seats (subject to your contract terms; some contracts have a minimum seat commitment).
Invoices — download PDF invoices for your accounting team. Invoices are generated at the start of each billing period.
Payment method — update credit card or banking details. Enterprise contracts are typically invoiced rather than card-charged; if you are on invoice terms, this section will reflect that.
First-time setup checklist
When you first receive admin access to a new Enterprise organisation, work through this checklist in order:
- Verify your admin account — confirm you can access the Admin Console and all six sections are visible.
- Add a second admin — never leave an organisation with only one admin; if that account is compromised or the person leaves, you lose administrative access.
- Configure SSO (if applicable) — do this before inviting large numbers of users, so they authenticate correctly from the start.
- Set 2FA enforcement — for users not covered by SSO.
- Configure session duration — align to your IT security policy.
- Review data retention — confirm the default retention setting matches your governance requirement; adjust if needed.
- Verify training opt-out — screenshot this as evidence for your compliance records.
- Invite pilot group — start with 10–20 users rather than your full user base.
- Create initial Projects — build the first 2–3 Projects for your pilot use cases.
- Set up usage monitoring — note the current baseline so you can track adoption.
Scenario: a new admin at a logistics company
Elena is the IT Manager at a 200-person logistics firm. She receives an email from Anthropic confirming the Enterprise contract is live. She logs in, discovers the Admin Console and works through the checklist. She notices that two-factor authentication is not enforced; her company's security policy requires MFA for all SaaS tools. She enables 2FA enforcement before inviting any users, preventing a policy gap from day one. She also confirms the training opt-out is active and takes a screenshot for the DPO's compliance file.
Key takeaway
The Admin Console gives you complete control over your Claude Enterprise organisation. Spend 30 minutes exploring every section before you invite your first user — familiarity with the layout means you will respond faster when something needs attention.
📖 Official Documentation See this in practice in Anthropic’s live support docs: